Adler's Antique Autos, Inc.
Author of "Notes from the Corrosion Lab"
801 NY Route 43, Stephentown, NY 12168
(518) 733 - 5749 Email
|
Articles
|
by Bob Adler
I would remind readers to use their shop manual as the final authority on electrical problem solving. Here are some of the more common maintenance kinks and caveats specifically for the Chevrolet instrument cluster.
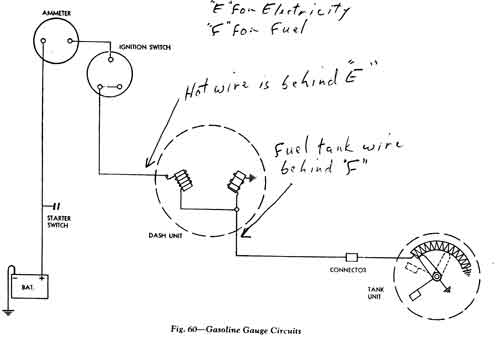
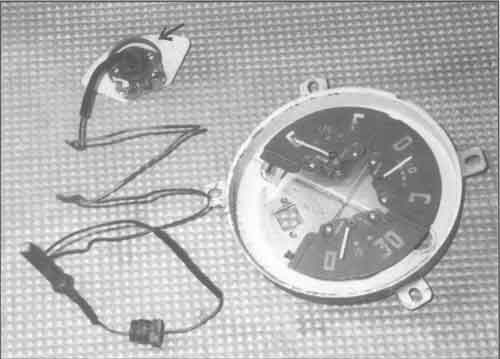
The most common problem with electric fuel gauges is the sender inside the tank rusting out. There is a very fine resistor wire wound around a semicircular form, which the float arm moves against to vary resistance as the fuel level changes. This fine wire either corrodes, which keeps the float terminal from making contact, or the wire breaks. This opens it electri which pegs the gauge at overfull. The other problem is a float that sinks, which makes the gauge read empty, or lower fuel level than actual. Either the cork disintegrates (1950 and earlier) or the later brass float cracks and fills with fuel. Replacement sending units or floats are currently available for most models. NOS cork may have a short life expectancy with modern fuel, but a reproduction brass float may reverse terminals on the dash unit when reinstalling. Red paper tag with illegible writing says, “Connect me to tank unit wire or I'm scrap metal.” If paper tag is missing make a note of which wire goes to each terminal before disassembling. Think of the terminal behind "E" on the face to be for "electricity" coming from the ignition switch. "F" on the face corresponds to the terminal going to the Fuel Tank."
|
In my 35+ years of working on Chevrolets, I have rarely seen a broken ammeter. They're hardy little devils. Very rarely they get out of calibration so they don't center at zero when no current is flowing. This is probably due to an overload distorting their magnets. I heard of a complaint that the ammeter does not register, except for a discharge when sounding the horn. This is due to the horn feed being hooked up to the wrong terminal on the ammeter. For many models and years the horn feed and cigar lighter are connected to the battery side of the ammeter, so these heavy loads do not actually go through the ammeter. This creates the curious situation where the ammeter jumps to “charge” instead of “discharge” when using these draining devices. Each Shop Manual has a complete wiring diagram which should be followed strictly. We are still finding new unintended consequences from unauthorized modifications.
Early oil pressure and temperature gauges were the mechanical Bourdon tube type. Oil pressure gauges are hardy, but not so with temperature gauges. A Bourdon tube is a flat rolled up metal pressure vessel. As the pressure inside it increases it tends to unroll, or straighten out. It is similar to a child's paper party toy that unrolls when blown into. The tube inside a gauge is only about half a turn long, and as it straightens out slightly it moves the gauge's pointer.
Oil gauges read pressure directly by way of a steel tube running from engine oil galley to the back of the gauge. If this tube is broken it is easily replaced, and no damage is done to the gauge. The steel tube has screw in end fittings that stay well lubricated and give little trouble.
The Temperature gauge tube is a different story. It needs lots of TLC (Tender Loving Care). It has a very thin copper capillary tube connecting engine to gauge. There is a bulb in the engine end that is filled with ether. As the engine warms up the ether boils, creating pressure to move the pointer. If the capillary tube breaks, which is the most common problem, the ether escapes, which renders the gauge inoperable. These are rebuildable by specialists. They replace the bulb, ether, and capillary tube and calibrate the gauge, besides attending to cosmetics. Care should be taken to avoid kinking the capillary tube. Make sure there is a rubber grommet in the firewall where the tube enters to prevent chafing. (Electric wires also need a grommet wherever they pass through sheet metal. Don't compromise this safety detail.) The square nut at cylinder head may stick to the bulb and twist off the tube during removal. Use a small dab of grease here when installing to keep the tube from sticking to the nut. I also do this on new hydraulic brake lines. The grease goes between flare nut and tube to keep the tube from rusting onto the nut. Keep grease away from the sealing surface so it doesn't enter the brake (or cooling) system. The greatest loss of temperature gauges is when engine removers opt for the quick cut on capillary tubes to expedite engine-ectomy. The time saved here is lost, of course, when gauge rebuilding is necessary.
|
Special note on fuel: California Gov. Gray Davis has just ordered the phase out of MTBE in gasoline. We don't yet know what it will be replaced with. I believe oxygenates, such as MTBE, are corrosive to fuel systems, and may accelerate deterioration of fuel gauge tank units. This is something to carefully monitor in all localities.
* Originally published in the Vintage Chevrolet Club of America, Inc.'s "Generator & Distributor", May 1999, v38, no. 5, p28.
Bob Adler is owner of Adler's Antique
Autos, Stephentown, New York, and
specializes in GM truck restoration.
He can be reached at 518-733-5749.
Email

